BugTrack Documentation
Complete guide to using and installing BugTrack — a premium issue tracking application for teams. This document covers every feature, installation steps, and troubleshooting.
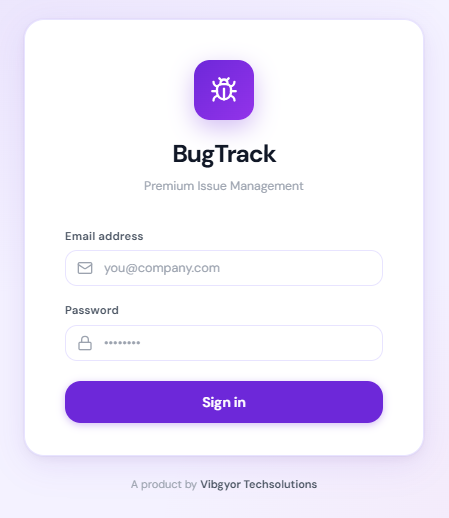
Signing In
When you open BugTrack, you see the login screen. Enter your email address and password, then click Sign in.
There is no self-registration. Only an administrator can create your account and give you login credentials.
Default Admin Account
On a fresh installation, BugTrack automatically creates one admin account:
- Email:
admin@bugtracker.com - Password:
Admin@123
Your Overview
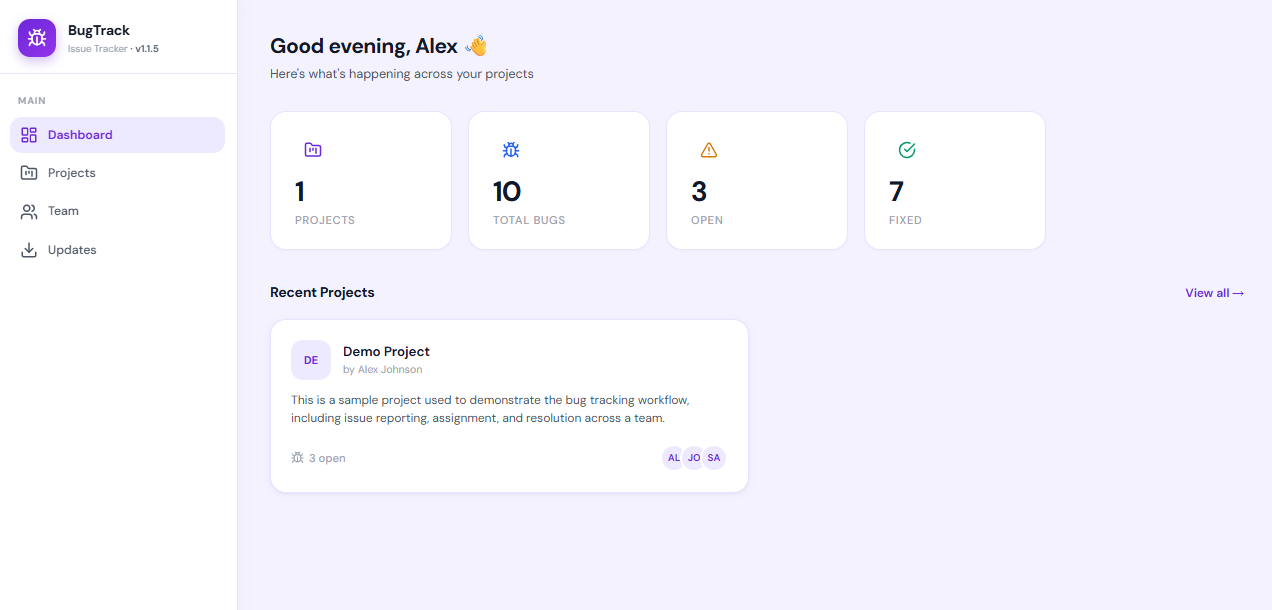
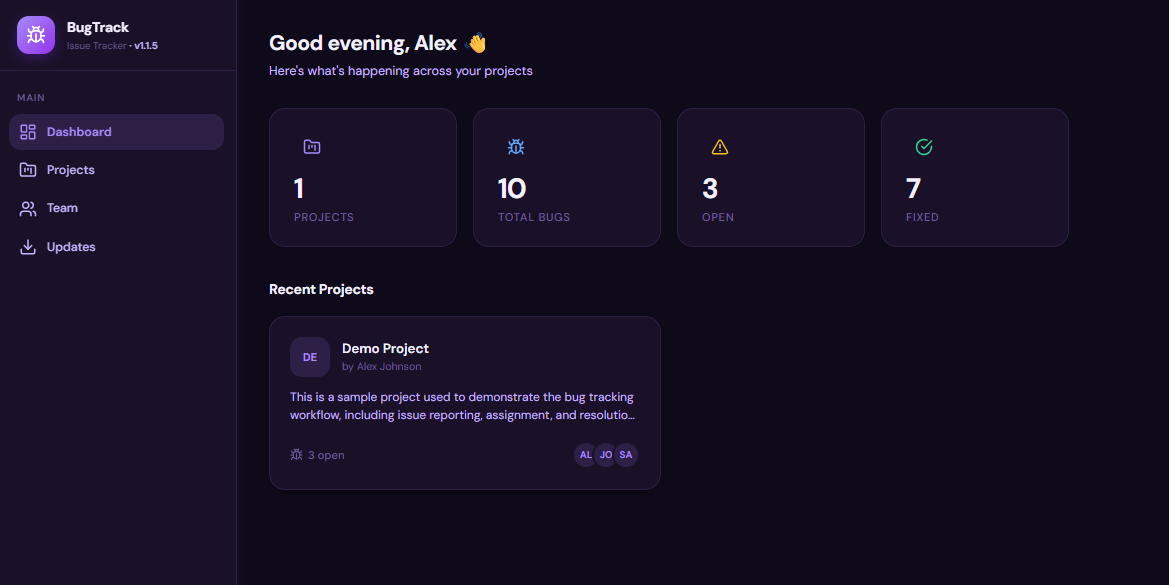
The dashboard is the first screen you see after logging in. It greets you by name and gives a quick summary of everything happening across your projects.
Stat Cards
Four cards at the top show your key numbers at a glance:
- Projects — Total number of projects you have access to
- Total Bugs — All bugs across all your projects
- Open — Bugs that still need attention
- Fixed — Bugs that have been resolved
Recent Projects
Below the stats, you see your most recent projects (up to 6). Each card shows the project name, who created it, a short description, how many bugs are open, and the team members assigned to it. Click any card to go directly to that project.
Main Navigation
The sidebar on the left side of the screen is your main way to get around BugTrack. It is always visible on desktop and can be opened with the menu button on mobile.
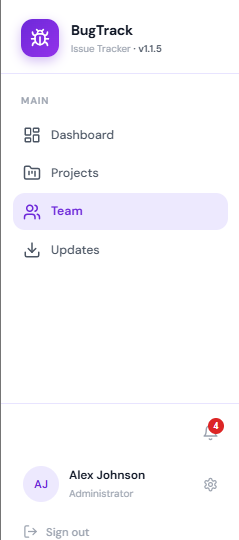
The navigation links are:
- Dashboard — Overview of all your projects and bugs
- Projects — View and manage all projects
- Team Admin — Manage users and team members
- Updates Admin — Check for and install app updates
Footer Area
At the bottom of the sidebar you will find:
- Notification bell — Shows your unread notification count
- Your profile card — Shows your name and role; click it to open Settings
- Sign out — Logs you out of BugTrack
The sidebar also shows the current app version (e.g. v1.1.5) next to the BugTrack logo.
All Your Projects
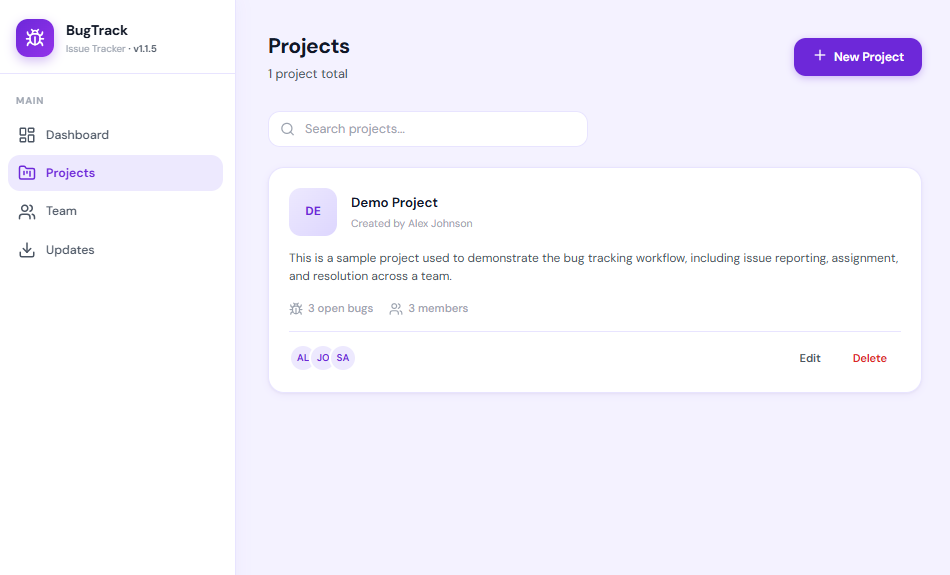
The Projects page shows all the projects you have access to. Admins can see every project in the system. Regular members can only see the projects they have been assigned to.
What Each Card Shows
- Project name and a two-letter avatar
- Who created the project
- A short description (if provided)
- Number of open bugs
- Number of team members
- Avatars of the team members
Search
Use the search bar at the top to quickly find a project by name. The list filters as you type.
Admin Actions
Administrators see Edit and Delete buttons on each project card. Regular members do not see these buttons.
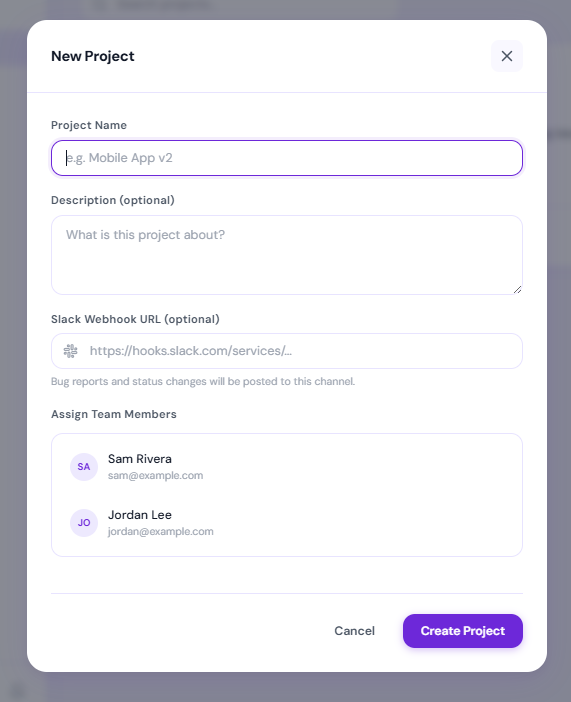
New Project Form Admin
Click the New Project button on the Projects page to open this form. Fill in the following:
- Project Name (required) — A short, clear name for the project
- Description (optional) — What the project is about
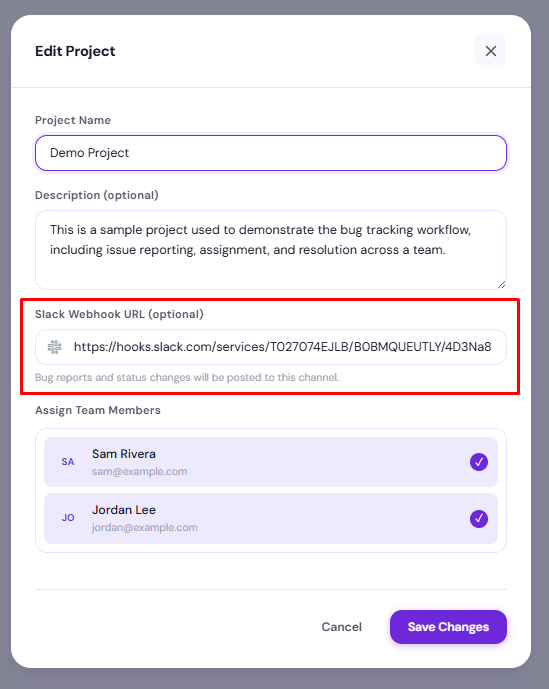
- Slack Webhook URL (optional) — If you want bug reports and status changes posted to a Slack channel, paste the incoming webhook URL here
- Assign Team Members — Check the boxes next to the team members who should have access to this project
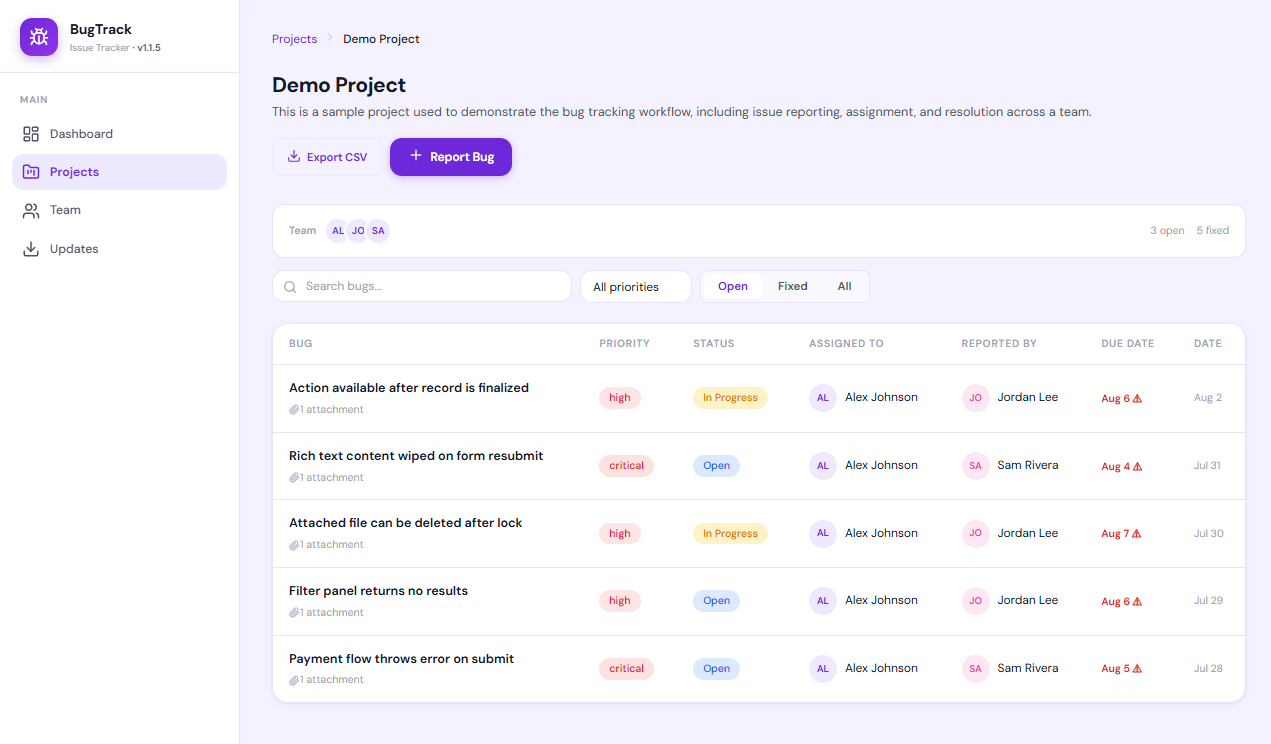
Inside a Project
Click on any project to see all its bugs. The page shows a breadcrumb at the top (Projects > Project Name) and the project description.
Bug Table
Each bug in the table shows:
- Title — The bug's name, plus an attachment count if it has images
- Priority — Color-coded tag: Low, Medium, High, or Critical
- Status — Color-coded tag: Open, In Progress, Fixed, or Closed
- Assigned To — The team member working on it
- Reported By — Who found the bug
- Due Date — Shows a warning icon if the bug is overdue
- Date — When the bug was reported
Filtering Bugs
Three ways to filter the bug list:
- Search — Type in the search box to filter by bug title
- Priority dropdown — Show only Low, Medium, High, or Critical bugs
- Status tabs — Switch between Open (includes In Progress), Fixed, or All
Team Members Bar
Above the filters, you can see all team members assigned to this project and counts of open and fixed bugs.
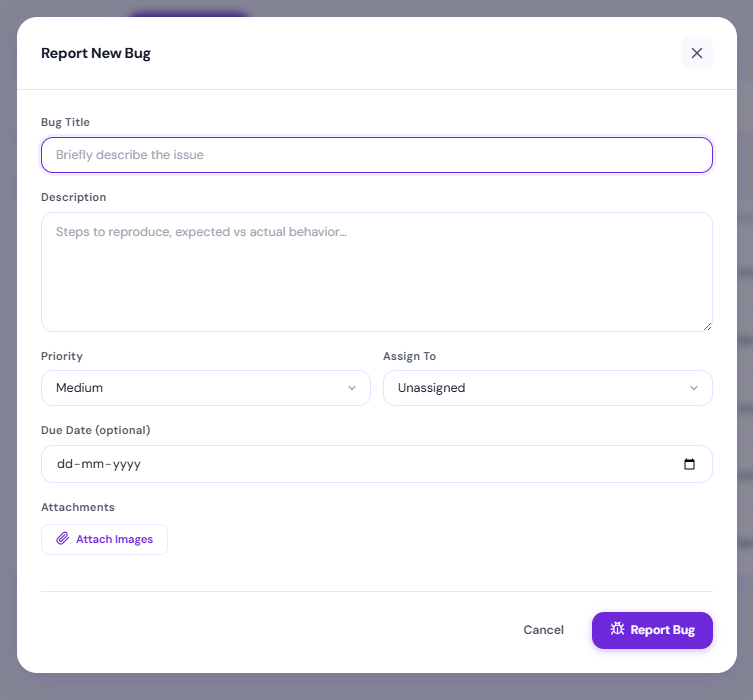
Filing a New Bug
Click the Report Bug button on any project page to open this form. Fill in:
- Bug Title (required, up to 200 characters) — A clear, short summary of the issue
- Description (up to 10,000 characters) — Steps to reproduce, expected vs actual behavior, or any extra detail
- Priority — Choose Low, Medium (default), High, or Critical
- Assign To — Pick a team member to work on it, or leave Unassigned
- Due Date (optional) — Set a deadline
- Attachments — Click "Attach Images" to upload screenshots (up to 10 images, max 10 MB each, images only)
When you submit a bug:
- The assigned person gets a notification
- If Slack is configured for the project, a message is posted to the channel
- If email (SMTP) is configured, the assigned person gets an email
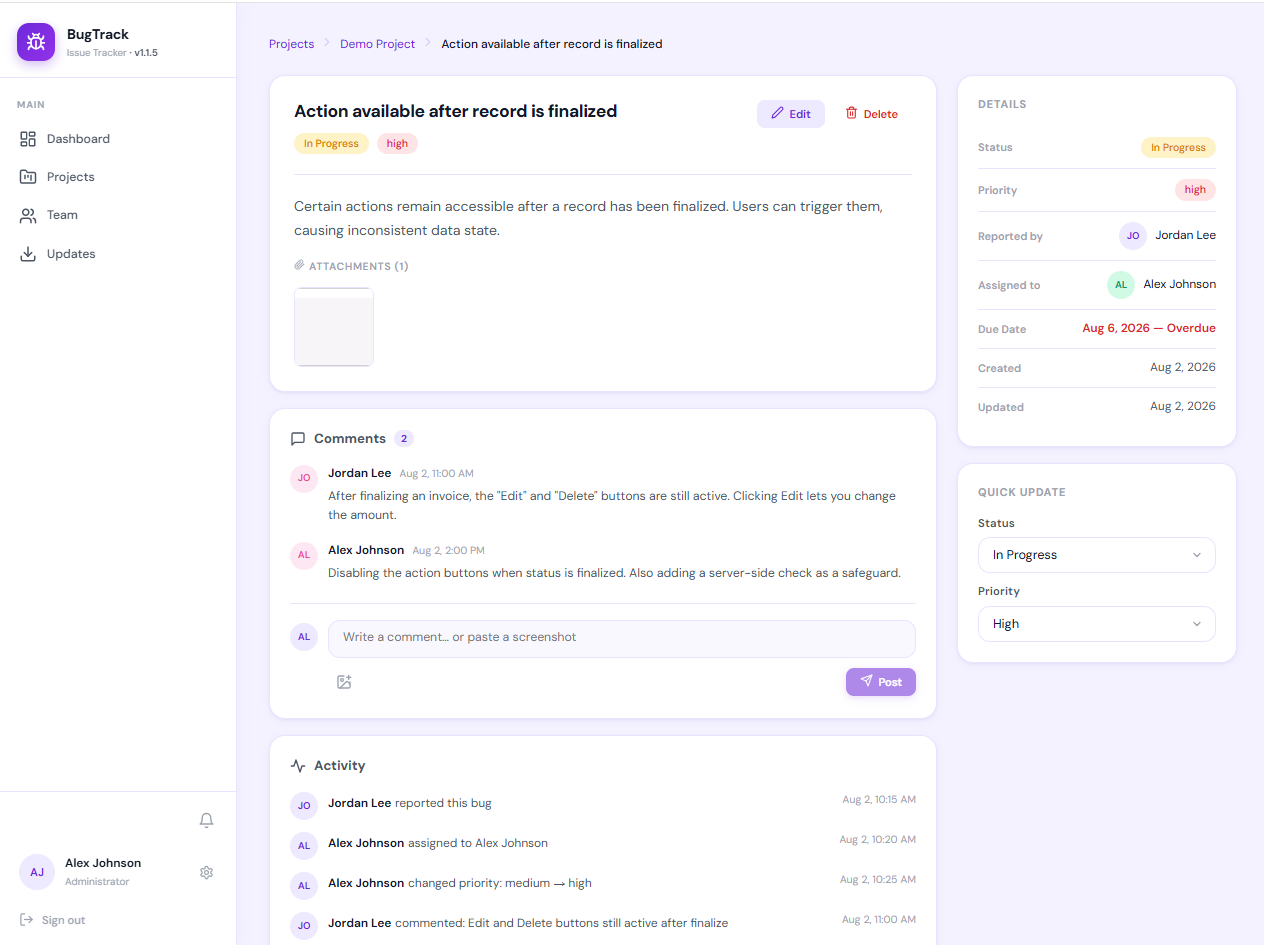
Everything About a Bug
Click any bug in the list to open its detail page. This page is split into two columns:
Main Area (left)
- Title, status, and priority tags at the top
- Description — The full bug description
- Attachments — Click any image to open a full-size lightbox view
- Edit / Delete buttons — Available to the reporter, assignee, or admins
Comments Section
- Read all comments with their timestamps
- Write a new comment, or paste a screenshot directly from your clipboard
- Use @mentions — type @ followed by a team member's name to mention them. A dropdown appears to autocomplete
- Attach images to your comments
- Press Enter to post, Shift+Enter for a new line
Activity Timeline
Below the comments, the Activity section shows a timeline of everything that happened — when the bug was created, when its status or priority changed, when it was reassigned, and when comments were posted.
Sidebar (right)
- Details card — Status, Priority, Reporter, Assignee, Due Date, Created and Updated dates
- Quick Update card — Instantly change status or priority from dropdown menus without opening the Edit modal. Changes are saved immediately.
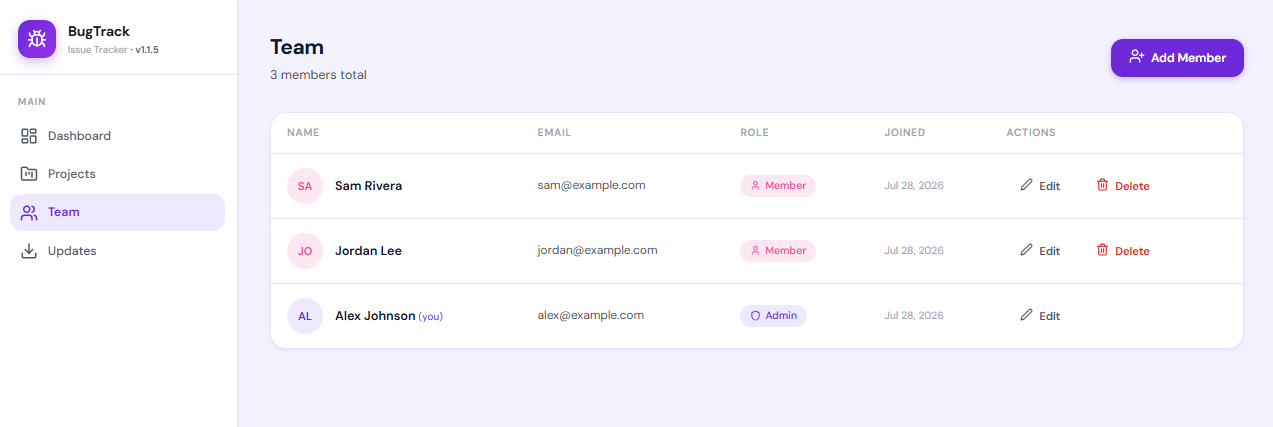
Managing Users Admin
The Team page (visible only to admins) shows all users in the system in a table:
- Name — With a two-letter avatar and "(you)" badge for your own account
- Email — Their login email
- Role — "Admin" or "Member"
- Joined — When the account was created
- Actions — Edit or Delete buttons
Adding a New Member
Click Add Member to create a new user account. Fill in:
- Full Name (required)
- Email Address (required, must be valid format)
- Password (required, min 6 characters)
- Role — Choose "Member" or "Admin"
Give the new member their email and password so they can log in.
Two Roles
- Admin — Can create projects, manage team members, access all projects, configure SMTP and updates, and delete any bug or comment
- Member — Can only see projects they are assigned to, report and edit bugs within those projects, and delete their own comments
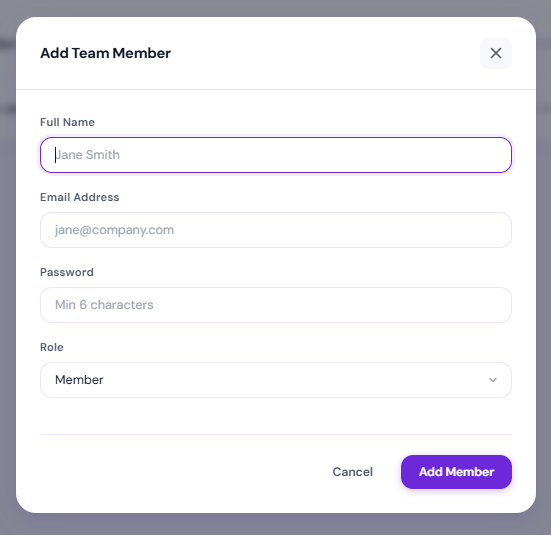
Adding a New Member Admin
Click Add Member to create a new user account. Fill in the full name, email address, password, and role. Give the new member their credentials so they can log in.
Two Roles
- Admin — Can create projects, manage team members, access all projects, configure SMTP and updates, and see everything
- Member — Can only see projects they are assigned to, report and edit bugs within those projects, and manage their own comments
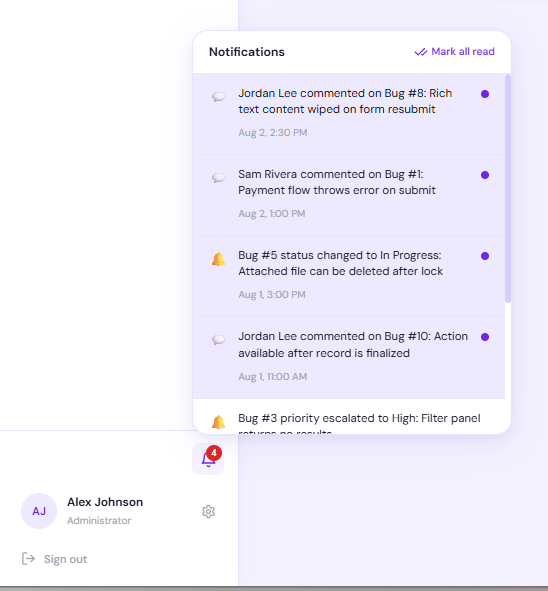
In-App Notifications All Users
The bell icon in the sidebar footer shows your unread notification count. Click it to open the notification panel.
You get notified when:
- A bug is assigned to you
- Someone comments on a bug you reported or are assigned to
- Someone @mentions you in a comment
- The status changes on a bug you reported or are assigned to
Managing Notifications
- Click any notification to mark it as read and jump to the related bug
- Click Mark all read to clear all unread badges at once
- Notifications are checked automatically every 30 seconds
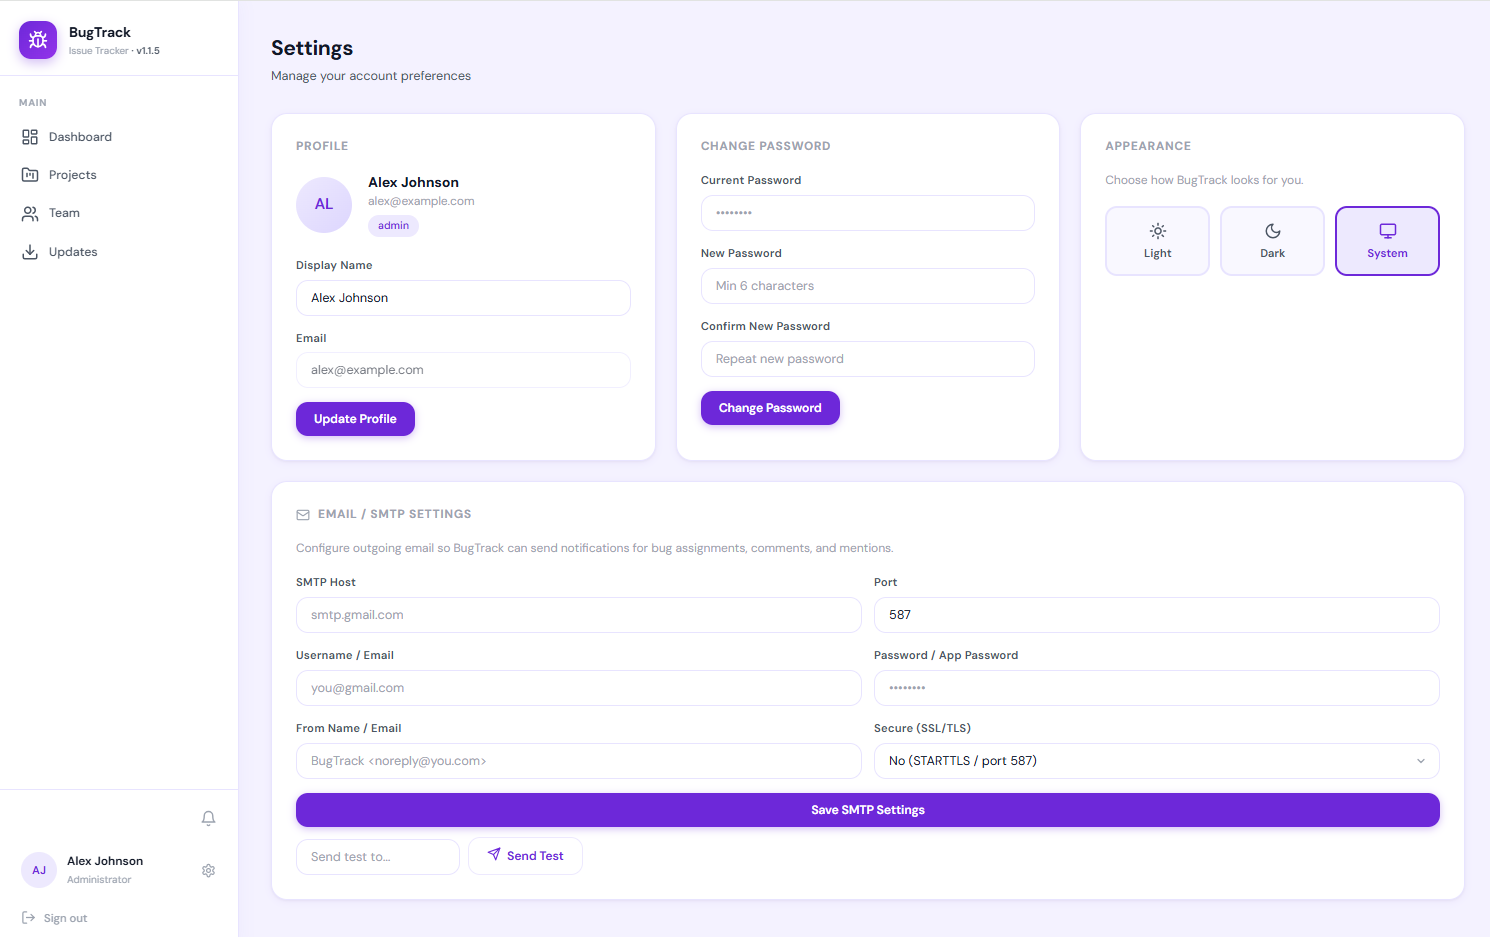
Account Settings All Users
Every user can access the Settings page by clicking their name in the sidebar.
Profile
Shows your avatar, name, email, and role. You can change your Display Name and click Update Profile. Your email cannot be changed from this page.
Change Password
Enter your current password, then your new password (minimum 6 characters), confirm it, and click Change Password.
Appearance
Choose between Light, Dark, or System (follows your operating system's setting). Your choice is saved and remembered.
Email / SMTP Settings Admin
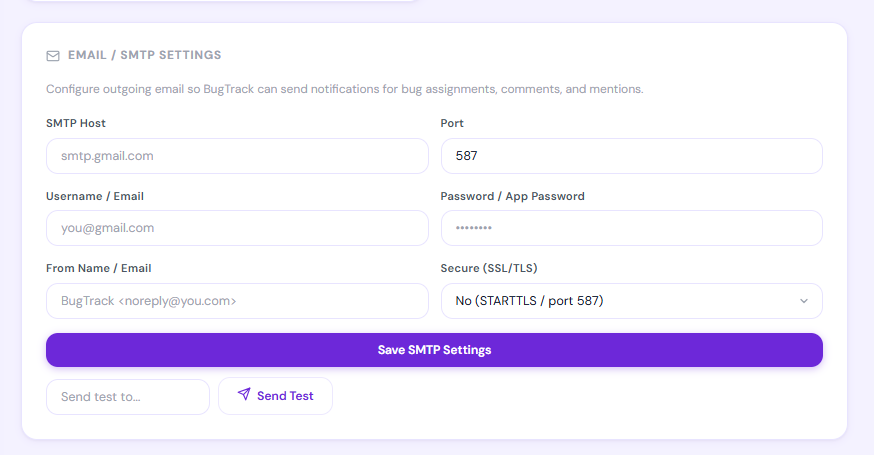
Only admins see this section. Configure outgoing email so BugTrack can send notifications. Fill in your SMTP server details:
- SMTP Host — e.g. smtp.gmail.com
- Port — 587 for STARTTLS, 465 for SSL
- Username — Your email login
- Password — Your email password or app password
- From Name / Email — What recipients see as the sender
- Secure — Choose SSL/TLS or STARTTLS
After saving, use the Send Test button to verify your configuration works.
Dark Theme
BugTrack has a full dark mode that works across every page of the application. To enable it, go to Settings > Appearance and click Dark.
You can also choose System, which automatically follows your operating system's light/dark setting.
Your preference is saved in your browser and remembered the next time you visit.
Keeping BugTrack Up to Date Admin
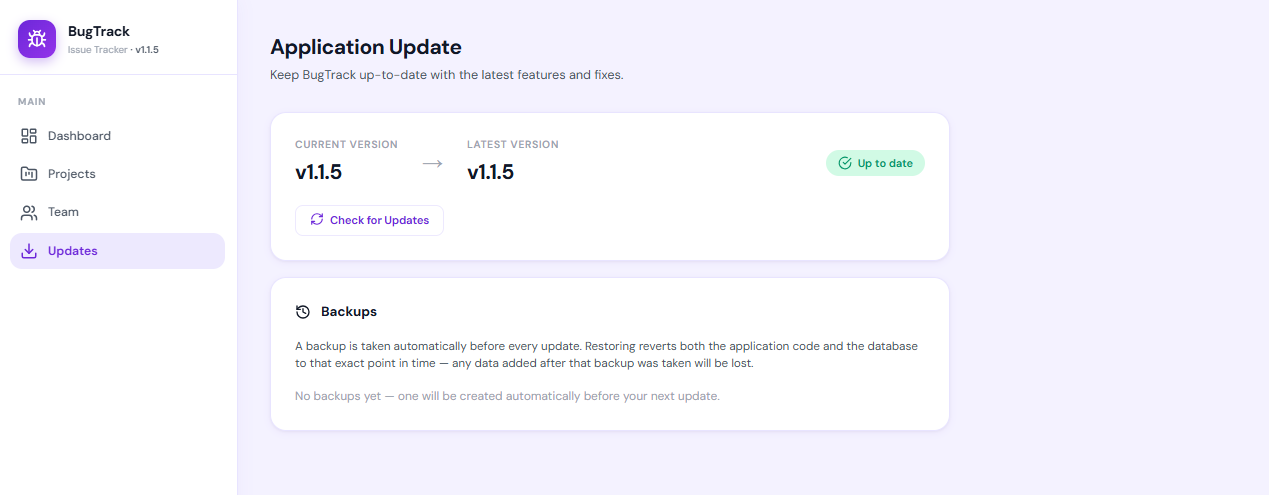
The Update page lets administrators check for and install new versions of BugTrack directly from the browser — no SSH or manual file transfers needed.
Checking for Updates
Click Check for Updates to see if a newer version is available. The page shows your current version and the latest version available. If an update is available, the sidebar will also show an "Update Available" badge.
BugTrack also checks for updates automatically in the background every hour.
Applying an Update
When an update is available, you see a What's New section showing what changed (new features, improvements, bug fixes). Click Apply Update to start. The process has 7 steps:
- 1
Download the update package
- 2
Back up your database
- 3
Back up application files
- 4
Verify backup integrity
- 5
Validate the update package
- 6
Apply the update and run database migrations
- 7
Restart the application
Backups & Restore
A backup is taken automatically before every update. If something goes wrong, scroll to the Backups section and click Restore this version on any backup. This reverts both the code and the database to that exact point in time.
If the app won't start at all after an update, you can restore via SSH:
node server/scripts/restore-backup.js --latest
Connecting Slack to a Project Admin
BugTrack can post notifications to a Slack channel whenever something happens in a project. This is configured per project — each project can have its own Slack channel.
Setup Steps
In Slack — do this once per channel:
- Go to api.slack.com/apps and sign in to your Slack workspace
- Click Create New App, then From scratch. Give it a name such as
BugTrack, choose the workspace, and click Create App - In the left sidebar under Features, click Incoming Webhooks, and turn the toggle On
- Scroll down and click Add New Webhook to Workspace
- Choose the channel the notifications should go to, then click Allow
- Copy the webhook URL that appears. It looks like
https://hooks.slack.com/services/T00000000/B00000000/XXXXXXXXXXXXXXXXXXXXXXXX
In BugTrack — do this once per project:
- Sign in as an admin, or as the lead of the project you are configuring
- Go to Projects and click Edit on the project (or create a new one)
- Paste the URL into the Slack Webhook URL field
- Click Save
A webhook is tied to the one channel you picked when you created it. To send a project’s notifications somewhere else, create a second webhook and paste that instead. To send several projects to the same channel, paste the same URL into each of them.
Treat the webhook URL as a secret: anyone who has it can post into that channel.
There is no test button for Slack. If the URL is wrong, BugTrack logs the failure on the
server and carries on, so that a Slack outage can never stop someone filing a bug. To check
your setup works, file a throwaway bug on the project and watch the channel. If nothing
arrives, confirm your server is allowed to make outbound HTTPS connections to
hooks.slack.com — on a firewalled server that is the usual cause.
What Gets Posted to Slack
- New Bug Reported — Title, project, priority, reporter, and description preview
- Bug Status Updated — Shows the old and new status with emoji indicators
- New Comment — Bug title, commenter name, and comment preview
Outgoing Email Admin
When SMTP is configured in Settings, BugTrack sends email notifications automatically. No action is needed from users — they receive emails at the address on their account.
Emails Are Sent When
- Bug Assigned — The assignee gets an email with the bug title, project, priority, and description
- New Comment — The reporter and assignee get an email (the commenter does not)
- @Mention — The mentioned person gets an email with the comment text
- Status Changed — The reporter and assignee get an email showing the old and new status
If SMTP is not configured, BugTrack works fine without it — you just won't get email notifications. In-app notifications still work regardless.
Exporting Bugs All Users
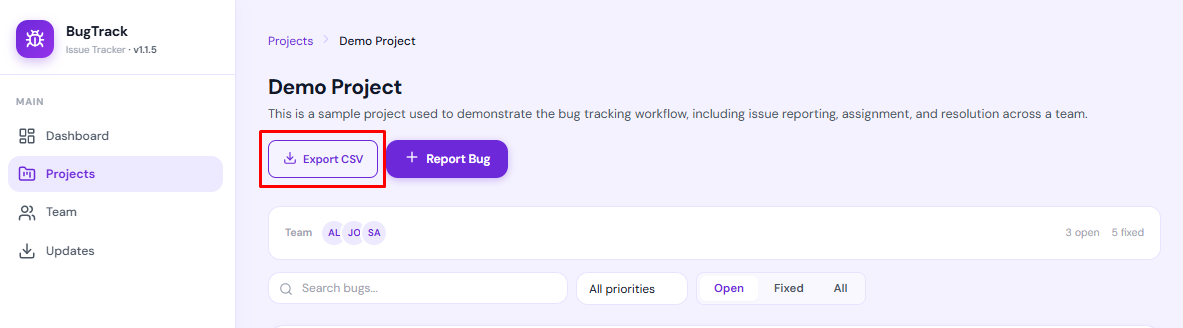
On any project detail page, click the Export CSV button to download the currently visible bugs as a CSV file. The export respects your current filters — if you are viewing only "Open" bugs, only those are exported.
The CSV includes these columns: ID, Title, Status, Priority, Reporter, Assigned To, Due Date, and Created date.
The file is named {project-name}-bugs.csv and can be opened in Excel, Google Sheets, or any spreadsheet application.
What You Need
- Node.js 18 or newer — BugTrack runs on Node.js. Check your version with
node -v - npm — Comes with Node.js. Used to install dependencies
- A server or hosting — cPanel shared hosting, VPS, or any server that can run Node.js
BugTrack uses SQLite as its database, which is built in. You do not need MySQL, PostgreSQL, or any separate database server.
Step-by-Step Installation
-
1
Upload the package
Upload the BugTrack ZIP file to your server (via File Manager, FTP, or SCP) and extract it into the folder where you want BugTrack to live.
-
2
Install dependencies
Open a terminal (SSH or cPanel Terminal) and navigate to the BugTrack folder, then run:
npm install --omit=dev
-
3
Configure environment
Open the
.envfile in a text editor and set your values (see the Environment Variables section below). At minimum, change theJWT_SECRETto something unique and random. -
4
Start the application
Run the following command:
node server/index.js
You should see:
Bug Tracker running at http://localhost:3001 -
5
Open in your browser
Go to
http://your-server-ip:3001(or your domain if configured). Log in with the default admin account and change the password immediately.
The .env File
BugTrack reads its configuration from a .env file in the root folder. Here are all the available settings:
| Variable | Default | What It Does |
|---|---|---|
PORT |
3001 |
The port BugTrack runs on. Change this if port 3001 is already in use on your server. |
JWT_SECRET |
bugtracker_super_secret_key_2024 |
The secret key used to sign login tokens. Always change this to a long, random string on production. If someone knows this value, they can forge login tokens. |
CLIENT_ORIGIN |
* |
Which domains can access the API. Set to your domain (e.g. https://bugs.yourcompany.com) for extra security, or leave as * to allow any origin. |
UPDATE_SERVER_URL |
(release server URL) | Where BugTrack checks for updates. You normally do not need to change this. |
BACKUP_RETENTION_COUNT |
5 |
How many pre-update backups to keep. Older backups are automatically deleted after a successful update. |
JWT_SECRET before going live. Use a random string at least 32 characters long. Never share or commit this value.
Installing on cPanel
Many shared hosting providers support Node.js apps through cPanel. Here is how to set it up:
-
1
Upload files — Use File Manager to upload and extract the BugTrack ZIP to a folder (e.g.
/home/username/bugtrack) -
2
Go to "Setup Node.js App" in cPanel
-
3
Create a new application with these settings:
- Node.js version: 18 or newer
- Application mode: Production
- Application root: the folder you uploaded to
- Application URL: your domain or subdomain
- Application startup file:
server/index.js
-
4
Edit the .env file — Set your
JWT_SECRETand any other values -
5
Run NPM Install — In the Node.js app panel, click "Run NPM Install" or use Terminal:
npm install --omit=dev -
6
Start the app — Click "Start" or "Restart" in the Node.js app panel
public folder contains the built React app (index.html and assets). The customer package includes this pre-built.
Installing on a VPS
On a VPS or dedicated server, you have more control. Here is a recommended setup using Ubuntu/Debian. Replace bugs.yourcompany.com with your actual domain throughout.
-
1
Install Node.js (if not installed):
curl -fsSL https://deb.nodesource.com/setup_20.x | sudo -E bash -
sudo apt-get install -y nodejs
Using nvm? If you installed Node via
nvm, thenodeandnpmbinaries live in your home directory (e.g.~/.nvm/versions/node/v20.x.x/bin/) and are not on the systemPATH. This meanssudo npm install -g pm2will fail, and PM2's startup script won't findnode. Fix this by creating symlinks so the system can find them:sudo ln -sf "$(which node)" /usr/local/bin/node sudo ln -sf "$(which npm)" /usr/local/bin/npm sudo ln -sf "$(which npx)" /usr/local/bin/npx
Run these before installing PM2 globally. After installing PM2, also symlink it:
sudo ln -sf "$(which pm2)" /usr/local/bin/pm2 -
2
Upload and extract BugTrack to your desired directory (e.g.
/var/www/bugtrack) -
3
Install dependencies and configure:
cd /var/www/bugtrack
npm install --omit=dev
nano .env   # Set JWT_SECRET and PORT
-
4
Set file ownership — The Node.js process (and the built-in updater) needs to read and write the entire app directory, including
server/uploads/and the SQLite database. If you run PM2 as a non-root user (recommended), make sure that user owns the app tree:sudo chown -R $USER:$USER /var/www/bugtrack
If your app lives at a different path (e.g.
/mnt/disk1/bugtracker), use that path instead. The in-app updater downloads and replaces files underserver/andpublic/— it will fail with permission errors if the Node process cannot write to those directories. -
5
Install PM2 to keep the app running:
sudo npm install -g pm2
pm2 start server/index.js --name bugtrack
pm2 save
pm2 startup   # Follow the printed command to auto-start on reboot
Verify PM2 is on your PATH: Run
which pm2. If it prints nothing, PM2 installed into a directory that isn't on the systemPATH(common with nvm). See the nvm note in Step 1 above. -
6
Set up a reverse proxy with Nginx:
First, install Nginx if you haven't:
sudo apt install nginxCreate a new site config file — do not edit
/etc/nginx/sites-enabled/defaultif you have other services on the same server:sudo nano /etc/nginx/sites-available/bugtrack
Paste the following:
server {
    listen 80;
    server_name bugs.yourcompany.com;

    client_max_body_size 12M;

    location / {
        proxy_pass http://127.0.0.1:3001;
        proxy_http_version 1.1;
        proxy_set_header Upgrade $http_upgrade;
        proxy_set_header Connection 'upgrade';
        proxy_set_header Host $host;
        proxy_set_header X-Real-IP $remote_addr;
        proxy_set_header X-Forwarded-For $proxy_add_x_forwarded_for;
        proxy_set_header X-Forwarded-Proto $scheme;
        proxy_cache_bypass $http_upgrade;
    }
}
Enable the site by creating a symlink, test the config, and reload Nginx:
sudo ln -s /etc/nginx/sites-available/bugtrack /etc/nginx/sites-enabled/
sudo nginx -t        # Must say "syntax is ok" — fix any errors before reloading
sudo systemctl reload nginx
-
7
Point DNS to your server — Before requesting an SSL certificate, your domain must resolve to this server's IP address. Add an A record in your DNS provider:
Type Name Value A bugs your server's public IP Wait for DNS to propagate. You can verify with:
dig +short bugs.yourcompany.com— it should return your server's IP. Certbot will fail if DNS hasn't propagated yet. -
8
Add SSL with Let's Encrypt:
sudo apt install certbot python3-certbot-nginx
sudo certbot --nginx -d bugs.yourcompany.com
Certbot will automatically modify your Nginx config to listen on port 443 with SSL, and add a redirect from HTTP to HTTPS. It will also set up a cron job to renew the certificate automatically before it expires (every 90 days).
After it completes, verify by visiting
https://bugs.yourcompany.com— you should see BugTrack with a padlock in the address bar.
"Invalid email or password"
- Make sure you are using the correct email address (all lowercase)
- On a fresh install, use
admin@bugtracker.comwith passwordAdmin@123 - If the admin changed your password and you forgot it, ask them to reset it from the Team page (Edit your user, set a new password)
Login page keeps appearing after logging in
- Your login token may have expired (tokens last 7 days). Log in again.
- If it happens immediately, the
JWT_SECRETin.envmay have changed since your last login. Log in again to get a new token. - Clear your browser's localStorage for the BugTrack site and try again.
Image uploads fail
- File too large — Maximum file size is 10 MB per image. Resize or compress the image before uploading.
- Wrong file type — Only image files are accepted (PNG, JPG, GIF, WebP, etc.). PDFs, documents, and videos are not supported.
- Too many files — You can attach up to 10 images per bug report or comment.
- Server disk full — Check that your server has enough disk space. Uploaded images are stored in the
server/uploads/folder.
Images appear broken
- Make sure the
server/uploads/folder exists and is readable by the Node.js process. - If using a reverse proxy (Nginx), make sure it is configured to pass
/uploadsrequests to the Node.js server.
"Could not reach update server"
- Your server cannot reach the internet or the update server is temporarily down.
- Check that the
UPDATE_SERVER_URLin.envis correct. - Try again in a few minutes.
Update failed midway
- BugTrack automatically takes a backup before every update. If the update fails, it tries to restore automatically.
- If the app won't start, connect via SSH and run:
node server/scripts/restore-backup.js --latest
- To see all available backups:
node server/scripts/restore-backup.js --list
App doesn't respond after update
- The app may need a manual restart. Go to your cPanel Node.js App panel and click "Restart", or on VPS run:
pm2 restart bugtrack - If that doesn't work, restore from backup as described above.
Test email fails
- Gmail — You need to use an "App Password", not your regular Gmail password. Go to Google Account > Security > 2-Step Verification > App Passwords, generate one, and use it as the SMTP password.
- Wrong port — Use port 587 with "No (STARTTLS)" or port 465 with "Yes (SSL)". Do not mix them up.
- SMTP host wrong — Common hosts:
smtp.gmail.com(Gmail),smtp.office365.com(Outlook),smtp.zoho.com(Zoho). - Firewall — Some servers block outgoing connections on port 587 or 465. Contact your hosting provider.
Emails go to spam
- Set the "From" address to a real email address on your domain.
- Set up SPF and DKIM records for your domain.
- Avoid using free email addresses (Gmail, Yahoo) as the "From" address in production.
App shows a blank white page
- The React build may be missing. Check that the
public/folder containsindex.htmland anassets/folder. - If you are running in development mode, make sure both the server and client are running (
npm run dev).
"Internal server error" on any page
- Check the terminal/logs for the actual error message. On cPanel, check the stderr log in the Node.js App panel. On VPS, run:
pm2 logs bugtrack - If the database is corrupted, the error log will say so. Restore from a backup.
App crashes on startup
- Run
node server/index.jsdirectly in the terminal to see the error. - Common causes: missing
node_modules(runnpm install), wrong Node.js version (need 18+), or a corrupted database file. - If the database file is corrupted, delete
server/bugtracker.dbto start fresh (you will lose all data) or restore from a backup.
Port already in use
- Another process is using port 3001. Either stop that process, or change the
PORTin.envto a different number (e.g. 3002).
Data and Uploads
- All data is stored in
server/bugtracker.db(SQLite database file) - All uploaded images are in
server/uploads/ - Never delete these two items when updating or moving BugTrack — they contain all your data
- To back up BugTrack manually, copy the
server/bugtracker.dbfile and theserver/uploads/folder to a safe location